(cleanup) |
|||
| (20 intermediate revisions by 15 users not shown) | |||
| Line 1: | Line 1: | ||
{{Header Nav|game=Pokémon Red and Blue}} | {{Header Nav|game=Pokémon Red and Blue}} | ||
After you receive the Boulder Badge, other Pokémon trainers will see you as a worthy opponent. No fewer than eight trainers wait to challenge you along Route #3. You'll have a tough time getting through them all, but you'll emerge from Route #3 a more powerful (and richer) trainer than ever. Stock up on Poké Balls to capture some more Pokémon in the wild too. | |||
__TOC__ | |||
{{-}} | {{-}} | ||
[[ | [[File:Pokemon RBY Route 3.png|thumb|400px|Route 3]] | ||
== On the way to Mt. Moon == | |||
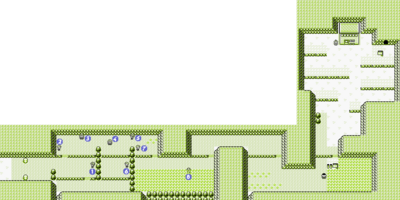
There are eight Pokémon trainers between [[Pokémon Red and Blue/Pewter City|Pewter City]] and the entrance to [[Pokémon Red and Blue/Mt. Moon|Mt. Moon]], but they're pretty easy to avoid. Some of them can pose a threat since they are close to the same level as your Pokémon. Still, you may need the EXP. | |||
Mt. Moon is tough because you will run into many wild Pokémon, as well as trainers who use a mix of a few Pokémon types. This is a good place to get a Pidgey or Spearow for your Flying-type, having a 90% chance (45% chance each) of getting one of them in Red and Blue and a 55% chance of getting a Spearow in Yellow. | |||
At the Mt. Moon Pokémon Center, you can pick up a black market {{bp|Magikarp}} for [[File:Pokebuck.png]]500. As for wild Pokémon, {{bp|Jigglypuff}} in Red and Blue are decent, but Yellow players shouldn't move on without a {{bp|Sandshrew}}. | |||
{{-}} | {{-}} | ||
{ | |||
| | ===Trainers=== | ||
{{ContentBoxContainer}} | |||
| | {{Pokemon/Trainer|RB}} | ||
| | {{Pokemon/Trainer row|RB|Lass||135}} | ||
| | {{Pokemon/Trainer mon|RB|016|9}} | ||
| | {{Pokemon/Trainer mon|RB|016|9}} | ||
| | {{Pokemon/Trainer row|RB|Bug Catcher||100}} | ||
| | {{Pokemon/Trainer mon|RB|010|10}} | ||
{{Pokemon/Trainer mon|RB|013|10}} | |||
| | {{Pokemon/Trainer mon|RB|010|10}} | ||
| | {{Pokemon/Trainer row|RB|Youngster||165}} | ||
| | {{Pokemon/Trainer mon|RB|019|11}} | ||
| | {{Pokemon/Trainer mon|RB|023|11}} | ||
| | {{Pokemon/Trainer row|RB|Bug Catcher||90}} | ||
| | {{Pokemon/Trainer mon|RB|013|9}} | ||
| | {{Pokemon/Trainer mon|RB|014|9}} | ||
| | {{Pokemon/Trainer mon|RB|010|9}} | ||
| | {{Pokemon/Trainer mon|RB|011|9}} | ||
| | {{Pokemon/Trainer row|RB|Youngster||210}} | ||
| | {{Pokemon/Trainer mon|RB|021|14}} | ||
| | {{Pokemon/Trainer row|RB|Lass||150}} | ||
| | {{Pokemon/Trainer mon|RB|019|10}} | ||
{{Pokemon/Trainer mon|RB|032|10}} | |||
| | {{Pokemon/Trainer row|RB|Bug Catcher||110}} | ||
| | {{Pokemon/Trainer mon|RB|010|11}} | ||
| | {{Pokemon/Trainer mon|RB|011|11}} | ||
| | {{Pokemon/Trainer row|RB|Lass||210}} | ||
| | {{Pokemon/Trainer mon|RB|039|14}} | ||
| | |} | ||
| | {{Pokemon/Trainer|YEL}} | ||
| | {{Pokemon/Trainer row|YEL|Lass||135}} | ||
| | {{Pokemon/Trainer mon|YEL|016|9}} | ||
{{Pokemon/Trainer mon|YEL|016|9}} | |||
| | {{Pokemon/Trainer row|YEL|Bug Catcher||100}} | ||
| | {{Pokemon/Trainer mon|YEL|010|10}} | ||
| | {{Pokemon/Trainer mon|YEL|013|10}} | ||
| | {{Pokemon/Trainer mon|YEL|010|10}} | ||
| | {{Pokemon/Trainer row|YEL|Youngster||165}} | ||
| | {{Pokemon/Trainer mon|YEL|019|11}} | ||
| | {{Pokemon/Trainer mon|YEL|023|11}} | ||
| | {{Pokemon/Trainer row|YEL|Bug Catcher||90}} | ||
| | {{Pokemon/Trainer mon|YEL|013|9}} | ||
| | {{Pokemon/Trainer mon|YEL|014|9}} | ||
| | {{Pokemon/Trainer mon|YEL|010|9}} | ||
| | {{Pokemon/Trainer mon|YEL|011|9}} | ||
| | {{Pokemon/Trainer row|YEL|Youngster||210}} | ||
|- | {{Pokemon/Trainer mon|YEL|021|14}} | ||
{{Pokemon/Trainer row|YEL|Lass||150}} | |||
| | {{Pokemon/Trainer mon|YEL|019|10}} | ||
| | {{Pokemon/Trainer mon|YEL|032|10}} | ||
{{Pokemon/Trainer row|YEL|Bug Catcher||110}} | |||
{{Pokemon/Trainer mon|YEL|010|11}} | |||
{{Pokemon/Trainer mon|YEL|011|11}} | |||
{{Pokemon/Trainer row|YEL|Lass||210}} | |||
{{Pokemon/Trainer mon|YEL|039|14}} | |||
|} | |||
</div> | |||
===Pokémon found=== | |||
{{ContentBoxContainer}} | |||
{{Pokemon/Wild|RB}} | |||
{{Pokemon/Wild row|RB||016|6-8|45|bp=1}} | |||
{{Pokemon/Wild row|RB||021|5-8|45|bp=1}} | |||
{{Pokemon/Wild row|RB||039|3,5,7|10|bp=1}} | |||
{{Pokemon/Wild row}} | |||
|} | |} | ||
{| | {{Pokemon/Wild|YEL}} | ||
| | {{Pokemon/Wild row|YEL||019|10,12|15|bp=1}} | ||
| | {{Pokemon/Wild row|YEL||021|10,12|55}} | ||
| | {{Pokemon/Wild row|YEL||027|8,10|15|bp=1}} | ||
| | {{Pokemon/Wild row|YEL||056|9|15|bp=1}} | ||
| | |||
| | |||
| | |||
| | |||
| | |||
| | |||
| | |||
| | |||
| | |||
|} | |} | ||
{{ | </div> | ||
== | |||
==New Pokémon== | |||
{{ContentBoxContainer}} | |||
{{Pokemon/New|title=#27 Sandshrew|contents={{PokePic|Sandshrew|left}} | |||
This Ground-type Pokémon doesn't learn anything particularly exciting on its own (Although it does get the powerful Slash attack at a fairly low level), but it has good Attack and Defense (especially in its final form after evolving), although it is rather lacking with its Special and Speed stats. Unlike those such as Onix and Geodude, the lack of a Rock-type means that it can potentially survive a medium power Grass-, Ice- or Water-type attack if it must take one. While it must use a TM to give it a Ground-type attack (Like Dig, which you'll get at the next town and Earthquake), Sandshrew is a great Pokémon that is pretty useful as a physical sweeper throughout the game. | |||
}} | |||
{{Pokemon/New|title=#39 Jigglypuff|contents={{PokePic|Jigglypuff|right}} | |||
Jigglypuff, even ''more'' ridiculously cute in Yellow, have a ton of HP, but are mediocre in all their other stats Their '''Sing''' attack is annoying to be put to sleep by, but is nearly a coin-flip in accuracy with it working only 55% of the time. STAB Pound works well enough early on, but Jigglypuff will be starved for good attacks until it learns Body Slam at level 34 and Double-Edge at 39. Jigglypuff ''can'' use a wide variety of powerful TMs, but it probably isn't worthy of these precious TMs, as the result isn't spectacular. Jigglypuff can evolve right away with a Moon Stone, found in Mt. Moon, but this will keep it from learning moves through leveling up. Jigglypuff, being a rather mediocre choice to have on your in-game team, is worse than Clefairy who is the better Normal-type counterpart choice because Clefairy has better offensive stats. | |||
}} | |||
{{Pokemon/New|title=#129 Magikarp|contents={{PokePic|Magikarp|left}} | |||
The thing about Magikarp is that they're completely useless. They come with only one move, Splash, and it does '''literally''' nothing. Magikarp can't learn any TMs or HMs and they don't even learn a real attack (which is the very weak Tackle) until level 15! | |||
''BUT'' if you can get one to level 20, it will evolve into {{bp|Gyarados}}, a Water/Flying-type with great stats and a small but useful move pool that includes the powerful Hydro Pump (and several more great moves by TM. | ''BUT'' if you can get one to level 20, it will evolve into {{bp|Gyarados}}, a Water/Flying-type with great stats (with a great Attack and good Special stats) and a small but useful move pool that includes the powerful Hydro Pump and Hyper Beam (and several more great moves by TM). | ||
If you want, you can buy it to begin leveling it up now. | If you want, you can buy it to begin leveling it up now. However, this will devour many experience points that would have (and should have) gone to other Pokémon at this early stage. You can fish for a Magikarp anywhere some other time once you get the Old Rod, and it's probably a good idea to do so. Then, train it up against more higher level Pokémon by sending Magikarp as the first Pokémon, then switching to one of your stronger Pokémon to finish off the opponent. | ||
}} | |||
</div> | |||
{{Footer Nav|game=Pokémon Red and Blue|prevpage=Pewter City | {{Footer Nav|game=Pokémon Red and Blue|prevpage=Pewter City|nextpage=Mt. Moon}} | ||
Revision as of 01:35, 21 March 2024
After you receive the Boulder Badge, other Pokémon trainers will see you as a worthy opponent. No fewer than eight trainers wait to challenge you along Route #3. You'll have a tough time getting through them all, but you'll emerge from Route #3 a more powerful (and richer) trainer than ever. Stock up on Poké Balls to capture some more Pokémon in the wild too.

On the way to Mt. Moon
There are eight Pokémon trainers between Pewter City and the entrance to Mt. Moon, but they're pretty easy to avoid. Some of them can pose a threat since they are close to the same level as your Pokémon. Still, you may need the EXP.
Mt. Moon is tough because you will run into many wild Pokémon, as well as trainers who use a mix of a few Pokémon types. This is a good place to get a Pidgey or Spearow for your Flying-type, having a 90% chance (45% chance each) of getting one of them in Red and Blue and a 55% chance of getting a Spearow in Yellow.
At the Mt. Moon Pokémon Center, you can pick up a black market Magikarp for ![]() 500. As for wild Pokémon, Jigglypuff in Red and Blue are decent, but Yellow players shouldn't move on without a Sandshrew.
500. As for wild Pokémon, Jigglypuff in Red and Blue are decent, but Yellow players shouldn't move on without a Sandshrew.
Trainers
| Red and Blue | |
|---|---|
| Trainer | Pokemon |
 Lass Reward: |
|
 Bug Catcher Reward: |
|
 Youngster Reward: |
|
 Bug Catcher Reward: |
|
 Youngster Reward: |
|
 Lass Reward: |
|
 Bug Catcher Reward: |
|
 Lass Reward: |
|
| Yellow | |
|---|---|
| Trainer | Pokemon |
 Lass Reward: |
|
 Bug Catcher Reward: |
|
 Youngster Reward: |
|
 Bug Catcher Reward: |
|
 Youngster Reward: |
|
 Lass Reward: |
|
 Bug Catcher Reward: |
|
 Lass Reward: |
|
Pokémon found
| Red and Blue | |||||||||||
|---|---|---|---|---|---|---|---|---|---|---|---|
| Pokémon | Level | Rate | |||||||||
| Pidgey | 6-8 | 45% | |||||||||
| Spearow | 5-8 | 45% | |||||||||
| Jigglypuff | 3,5,7 | 10% | |||||||||
| Yellow | |||
|---|---|---|---|
| Pokémon | Level | Rate | |
| Rattata | 10,12 | 15% | |
| Spearow | 10,12 | 55% | |
| Sandshrew | 8,10 | 15% | |
| Mankey | 9 | 15% | |
New Pokémon

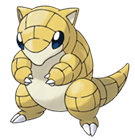
This Ground-type Pokémon doesn't learn anything particularly exciting on its own (Although it does get the powerful Slash attack at a fairly low level), but it has good Attack and Defense (especially in its final form after evolving), although it is rather lacking with its Special and Speed stats. Unlike those such as Onix and Geodude, the lack of a Rock-type means that it can potentially survive a medium power Grass-, Ice- or Water-type attack if it must take one. While it must use a TM to give it a Ground-type attack (Like Dig, which you'll get at the next town and Earthquake), Sandshrew is a great Pokémon that is pretty useful as a physical sweeper throughout the game.

Jigglypuff, even more ridiculously cute in Yellow, have a ton of HP, but are mediocre in all their other stats Their Sing attack is annoying to be put to sleep by, but is nearly a coin-flip in accuracy with it working only 55% of the time. STAB Pound works well enough early on, but Jigglypuff will be starved for good attacks until it learns Body Slam at level 34 and Double-Edge at 39. Jigglypuff can use a wide variety of powerful TMs, but it probably isn't worthy of these precious TMs, as the result isn't spectacular. Jigglypuff can evolve right away with a Moon Stone, found in Mt. Moon, but this will keep it from learning moves through leveling up. Jigglypuff, being a rather mediocre choice to have on your in-game team, is worse than Clefairy who is the better Normal-type counterpart choice because Clefairy has better offensive stats.

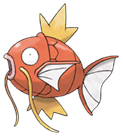
The thing about Magikarp is that they're completely useless. They come with only one move, Splash, and it does literally nothing. Magikarp can't learn any TMs or HMs and they don't even learn a real attack (which is the very weak Tackle) until level 15!
BUT if you can get one to level 20, it will evolve into Gyarados, a Water/Flying-type with great stats (with a great Attack and good Special stats) and a small but useful move pool that includes the powerful Hydro Pump and Hyper Beam (and several more great moves by TM).
If you want, you can buy it to begin leveling it up now. However, this will devour many experience points that would have (and should have) gone to other Pokémon at this early stage. You can fish for a Magikarp anywhere some other time once you get the Old Rod, and it's probably a good idea to do so. Then, train it up against more higher level Pokémon by sending Magikarp as the first Pokémon, then switching to one of your stronger Pokémon to finish off the opponent.